Knight vs Trolls Part 1: Trolls and Swords
In this tutorial we will begin implementing our Knight vs Trolls game. We will build on the demo code we wrote for previous tutorials. Our goal for this tutorial is to introduce enemies to the game (trolls!) and to arm our knight with a sword so they can defend themselves.
Trolls
Our troll enemy is very similar to the knight. It has an animation component with two clips: an idle animation and a run animation. It also has a bounding box which will be used to have the troll hit the knight and vice versa.
type Troll struct {
    animation          game.Animation
    idleClip, runClip  int
    hurtbox            *game.BoundingBox
    game.GameObjectCommon
}
For our initialization, we use must load the troll sprites into the sprite atlas making sure we only do that once. In previous tutorials we used the following structure to do this:
var coinFrames = []string{
    "data/coin_anim_f0.png",
    "data/coin_anim_f1.png",
    "data/coin_anim_f2.png",
    "data/coin_anim_f3.png",
}
var coinClip = []int{}

func NewCoin(position math.Vector2[float32]) *Coin {
    if len(coinClip) == 0 {
        coinClip, _ = Game.Atlas.AddImagesFromFiles(coinFrames)
    }
    //...
}
We use this mechanism on every game object we create so it makes
sense to organize it a little. The ClipData object does
exactly this. It holds a list fo images that make up a clip, loads them
into the game atlas and stores the corresponding sprite ids. Crucially,
it will only load the data once even if LoadOnce is called
more than once.
type ClipData struct {
    Images    []string
    spriteIds []int
}

func NewClipData(images []string) ClipData {
    return ClipData{
        Images: images,
    }
}

func (c *ClipData) LoadOnce(atlas *sprite.Atlas) error {
    if len(c.spriteIds) != 0 {
        return nil
    }
    var err error
    c.spriteIds, err = atlas.AddImagesFromFiles(c.Images)
    return err
}
We can use ClipData to load our Troll’s animation frames
with the following code. By using ClipData the
initialization of each game object becomes less cluttered.
var trollIdleClip = NewClipData([]string{
    "data/ogre_idle_anim_f0.png",
    "data/ogre_idle_anim_f1.png",
    "data/ogre_idle_anim_f2.png",
    "data/ogre_idle_anim_f3.png",
})

var trollRunClip = NewClipData([]string{
    "data/ogre_run_anim_f0.png",
    "data/ogre_run_anim_f1.png",
    "data/ogre_run_anim_f2.png",
    "data/ogre_run_anim_f3.png",
})

func NewTroll(position math.Vector2[float32]) *Troll {
    troll := &Troll{}
    troll.animation = game.NewAnimation()
    trollIdleClip.LoadOnce(Game.Atlas)
    trollRunClip.LoadOnce(Game.Atlas)
    troll.idleClip = troll.animation.AddClip(trollIdleClip.spriteIds, Game.Atlas, &Game.Shader, 0)
    //...
}
Troll Intelligence
Our troll’s behavior will be very simple. They will idle doing nothing until they sense an enemy. Once they do, they will run straight at them and try to hit them. To implement this we need a way for the trolls to ‘sense’ enemies. We can achieve this with a couple of methods. Perhaps the easiest it to pass a pointer to the game object that the troll needs to sense (for example our knight) and then take the distance of the knight and the troll. If the distance is smaller than a threshold, we sense the enemy.
func (t *Troll) Update(dt time.Duration) {
    if t.GetTranslation().Sub(t.enemy.GetTranslation()).Length() < 50 {
        // attack!
    }
    //...
The problem with this approach is providing access to the enemy game
object t.enemy. If the enemy is known beforehand, like our
knight, this is easy to do. But, if we want our troll to dynamically
respond to any enemy this doesn’t work.
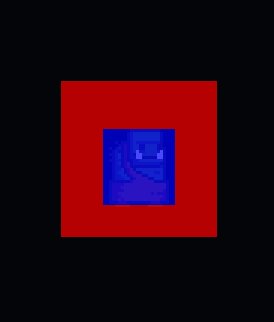
Instead, we will use the collision system to sense enemies. We will
add a second bounding box to our troll and make it much bigger than its
hurtbox. The following shows the troll’s hurtbox in blue and it’s
vision box in red.
Once a game object enters that bounding box we can check it’s tags to figure out if it’s an enemy and act accordingly:
func (t *Troll) Update(dt time.Duration) {
    seen := t.visionBox.CheckForCollisions()
    for i := range seen {
        if game.HasTag(seen[i], TagKnight) {
            destination := seen[i].GetTranslation().XY()
            t.SetDestination(destination)
        }
    }
Notice that we only consider knight as the enemy here but that can be easily changed by adding more tags.
For our attack, we will for now just walk towards our enemy. To make our Troll walk we can reuse the logic we have for our knight’s movement. For the knight we set a destination using the mouse and our knight walks there. For the troll, we can set the destination to be the enemy’s position.
To implement the movement we could copy the code from knight but we
are likely to have other moving game objects so it makes sense to put
the moving logic in a component. We call this component
Walker.
type Walker struct {
    destination    math.Vector2[float32]
    hasDestination bool

    Speed float32
}

func (w *Walker) Update(dt time.Duration, parent game.GameObject) {
    if !w.hasDestination {
        return
    }
    if parent.GetTranslation().Sub(w.destination.AddZ(0)).Length() < math.EpsilonVeryLax {
        w.hasDestination = false
        return
    }

    fdt := float32(dt.Seconds())
    parentPosition := parent.GetTranslation()
    moveVector := w.destination.Sub(parentPosition.XY()).Normalize()
    fmt.Println(parentPosition, w.destination, moveVector, fdt)
    parent.SetTranslation(parentPosition.Add(moveVector.Scale(w.Speed * fdt).AddZ(parentPosition.Z)))
    if moveVector.X > 0 {
        w.faceRight(parent)
    } else {
        w.faceLeft(parent)
    }
}

func (w *Walker) SetDestination(destination math.Vector2[float32]) {
    w.hasDestination = true
    w.destination = destination
}

func (w *Walker) faceLeft(parent game.GameObject) {
    parent.SetRotation(math.Vector3[float32]{0, 3.14, 0})
}

func (w *Walker) faceRight(parent game.GameObject) {
    parent.SetRotation(math.Vector3[float32]{0, 0, 0})
}

func (w *Walker) IsMoving() bool {
    return w.hasDestination
}
The Walker component receives a destination with
SetDestination and it moves towards it constantly until it
comes close to it and stops. We detect that we arrive at our destination
by taking the distance of our character and the destination:
if parent.GetTranslation().Sub(w.destination.AddZ(0)).Length() < math.EpsilonVeryLax {
    w.hasDestination = false
}
To move the character, we create a vector from the character to the destination:
parentPosition := parent.GetTranslation()
moveVector := w.destination.Sub(parentPosition.XY()).Normalize()
We then scale this vector by the movement speed. This lets us use the
same component for characters with various speeds. The speed is
modulated by the delta time (fdt) so it runs consistently across
machines. See this tutorial if you are
not sure why we multiply by fdt.
parent.SetTranslation(parentPosition.Add(moveVector.Scale(w.Speed * fdt).AddZ(parentPosition.Z)))To make our trolls walkers we simply add the component:
type Troll struct {
    animation          game.Animation
    idleClip, runClip  int
    hurtbox, visionBox *game.BoundingBox

    Walker // NEW
    game.GameObjectCommon
}
And the complete Update function of our troll becomes:
func (t *Troll) Update(dt time.Duration) {
    seen := t.visionBox.CheckForCollisions()
    for i := range seen {
        if game.HasTag(seen[i], TagKnight) {
            destination := seen[i].GetTranslation().XY()
            t.SetDestination(destination)
        }
    }

    if t.IsMoving() {
        t.animation.SetClip(t.runClip)
    } else {
        t.animation.SetClip(t.idleClip)
    }

    t.Walker.Update(dt, t)
    t.animation.Update(dt, t)
    t.hurtbox.Update(dt, t)
    t.visionBox.Update(dt, t)
}
Below you can see a Troll chasing our helpless knight around.
Arming our Knight
The trolls are becoming dangerous so our knight needs a weapon to
defend themselves. A sword will do nicely. Sword is a game
object that can be added as a child of another game object. It has a
single sprite and we will animate it by rotating and moving it with
code. This is a bit of an unorthodox approach, it would be easier to
make an animation sequence rather than move a single sprite with code
but let’s do it anyway for educational purposes.
The Sword is given by the following struct:
type Sword struct {
    sprite        *sprite.Sprite
    offset        math.Vector3[float32]
    attackOffset  math.Vector3[float32]
    midSwing      bool
    swingDuration float32
    swingTime     float32
    hitbox        *game.BoundingBox
    game.GameObjectCommon
}
As mentioned it has a single sprite and a bounding box
(hitbox) is used to detect when the sword hits something.
The rest of the parameters control the animation of the sword as it
swings. offset is the distance of the sword from it’s
holder. We don’t want the sword to appear directly on top of our knight
so we will use this value to move it slightly. attackOffset
is the position of the sword after it has been swung. The following
shows offset in green and attackOffset in red.
In our animation, the weapon will also be rotated in the
attackOffset position.

To implement the sword swing we will move the sword’s position from
offset to attackOffset and also rotate it by
about 90 degrees. The sword begins to swing once it’s
midSwing variable is set to true.
func (s *Sword) Swing() {
    if !s.midSwing {
        s.midSwing = true
        swingEffect.Play(0)
    }
}
In update, we interpolate the position and rotation of the sword
while midSwing is true.
func (s *Sword) Update(dt time.Duration) {
    position := s.offset
    rotation := math.Vector3[float32]{}
    if s.midSwing {
        t := float32(dt.Seconds())
        delta := s.swingTime / s.swingDuration
        position = s.offset.Lerp(s.attackOffset, delta)
        rotation = math.Vector3[float32]{0, 0, 0}.Lerp(math.Vector3[float32]{0, 0, -1.57}, delta)
        s.swingTime += t
        if s.swingTime > s.swingDuration {
            s.midSwing = false
            s.swingTime = 0
        }
    }
We use delta time (dt) to calculate how far in the
animation we are (delta := s.swingTime / s.swingDuration).
We use this delta parameter, which will take values between
0 and 1, as the parameter to guide our interpolation. When delta is 0
the sword will be at offset and it’s rotation will be zero.
When delta is 1 it will be at attackOffset and its rotation
will be -1.57 radians (90 degrees). In-between values of delta will give
in-between values of position and rotation.
We need to apply these values to the sword which we do with the following code.
    position = game.Transform(s.GetParent(), position)
    position.Z += 1 // bring to front of parent
    s.SetTranslation(position)
    s.SetScale(s.GetParent().GetScale().Mul(math.Vector2[float32]{0.7, 0.7}))
    s.sprite.SetPosition(position)
    s.sprite.SetScale(s.GetParent().GetScale().Mul(math.Vector2[float32]{0.7, 0.7}))
    s.sprite.SetRotation(rotation.Add(s.GetParent().GetRotation()))
    s.hitbox.Update(dt, s)
The tricky part in this code is the first line. The
Transform function modifies the position of the sword to
match that of the parent. It does this using matrix multiplication and
ensures that the sword stays in front of it’s parent even if the parent
rotates around1.
In Update we also check for collisions between the sword and any
potential enemies. We only do this when the sword is
midSwing and only after it has done half of the
animation.
    // sword only hurts midSwing
    if s.midSwing && s.swingTime > 0.5*s.swingDuration {
        collisions := s.hitbox.CheckForCollisions()
        for i := range collisions {
            if game.HasTag(collisions[i], TagEnemy) {
                s.Knockback(collisions[i])
            }
        }
    }
If the sword hits some enemy it knocks them back using this function:
func (s *Sword) Knockback(g game.GameObject) {
    gpos := g.GetTranslation()
    spos := s.sprite.GetPosition()
    vector := gpos.XY().Sub(spos.XY())
    vector = vector.Normalize()
    vector = vector.Scale(40)
    gpos = gpos.Add(vector.AddZ(0))
    g.SetTranslation(gpos)
}
The code calculates a vector between the sword and the enemy hit and translates (moves) the enemy across that vector a fixed distance.
Notes
As mentioned, the implementation for the sword swing is rather
complicated. It’s meant to show how we can use transforms to move a game
object relative to another. In this case, the sword moves with the
parent and stays in front of the parent even when they rotate left and
right. The same thing can be achieved more easily with other techniques.
The sword swing can be animated with a sequence of sprites. Keeping the
sword in front of the player can be done with an if
statement that checks the parent’s rotation value. It might be good
practice to re-write the sword implementation with this approach.